Friday, November 12, 2010
Tips merubah background flash disk
Mungkin bagi anda ada yang belum tahu bagaimana sih merubah background flas disk?? Caranya gampang banget:D Bagi anda yang sudah tahu dilewati saja:P
Langkah pertama yang perlu disiapkan :
1. Flasdisk yang mau dkasih backgrond
2. FIle *.jpg (file gambar yang mau dijadikan background), kalo bisa file ber ekstention .jpg aj coz biasanya size lebih kecil.
3. Script yang digunakan + komputer:D
Okey langsung saja, buka program notepad dan copy paste script dibawah ini :
[ExtShellFolderViews]
{BE098140-A513-11D0-A3A4-00C04FD706EC}={BE098140-A513-11D0-A3A4-00C04FD706EC}
[{BE098140-A513-11D0-A3A4-00C04FD706EC}]
Attributes=1
IconArea_Image=filegambar.jpg
IconArea_Text=0xcc00aa
[.ShellClassInfo]
ConfirmFileOp=0
Kemudian simpan file diatas dengan nama desktop.ini dan jagan lupa waktu simpan file typenya di pilih all files.
Jangan lupa semua file di simpan di flashdisk, filegambar.jpg dan desktop.ini di taruh dalam satu tempat( maksudnya di flash disk halaman dpan jangan ditempat laen ya).
Jika sudah silahkan anda lihat hasilnya:)
Set up Internet Connection Sharing with Windows XP
PLANT 1

KONFIGURASI IP Address pada PC Client tersebut adalah sebagai berikut :
IP Local Modem ADSL : 192.168.0.1
Komputer Client 1
IP LAN : 192.168.0.2
Gateway : 192.168.0.1
DNS-1 : 202.134.1.0
DNS-2 : 203.130.196.155
Komputer Client 2
IP LAN : 192.168.0.3
Gateway : 192.168.0.1
DNS-1 : 202.134.1.0
DNS-2 : 203.130.196.155
Komputer Client 3
IP LAN : 192.168.0.4
Gateway : 192.168.0.1
DNS-1 : 202.134.1.0
DNS-2 : 203.130.196.155
Dst… dst… dst
IP Gateway di PC Client diisikan IP Address dari modem ADSL. IP Preferred DNS Server dan IP Alternated DNS Server diisikan IP DNS Server SPEEDY. Jika kita punya DNS Server Local, bisa ditambahkan di menu Advanced.

PLANT 2
Organizations with networks that include a connection to the Internet have hubs and routers to enable all the users to share the connection.
Windows XP Professional and Home Edition come with two great services, Internet Connection Sharing (ICS) and Internet Connection Firewall (ICF). ICS and ICF allow a home user to share an always-on connection with security and without buying a license for expensive firewall software. Even a dial-up link can benefit from ICS and ICF, providing network address translation, addressing, and name resolution services for all the computers on your network plus security.
Setting Up Internet Connection Sharing
You will need to designate a Windows XP computer as the host. This computer must have two network adapters, one for your internal network and one for the Internet connection. Before attempting to enable ICS, verify that the host computer has a working connection to the Internet through the network card connected to the cable modem or DSL line, or on the network connection associated with the modem. The easiest way to enable ICS is to use the Network Setup Wizard, by following these steps:
- Click Start, point to All Programs, point to Accessories, point to Communications, and then click Network Setup Wizard.
- Click Next until you see the Select a connection method screen.
- Click This computer connects directly to the Internet, and complete the wizard to install ICS.
Turning on ICS manually is almost as easy as using the wizard except that you need to create the bridge for multiple network cards before enabling ICS. Then do the following steps:
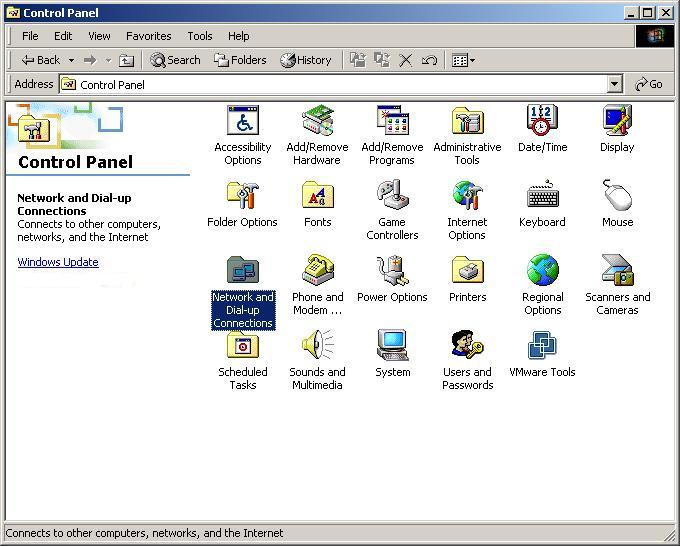
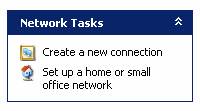
- In Control Panel, click Network and Internet Connections and then click Network Connections.
- Click the local area network (LAN) connection or the dial-up networking connection that you want to share (that is, the one that connects to the Internet), and then, under Network Tasks, click Change settings of this connection.
- Disable Client for Microsoft Networks and File and Print Sharing for Microsoft Networks by clearing the check boxes shown in Figure

- Click the Advanced tab, and select the Allow other network users to connect through this computer's Internet connection check box.

- You can enable or disable the allowing of other users to control the connection—users don't need to be able to control the connection to use it.
- Under Internet Connection Firewall, select the Protect my computer and network by limiting or preventing access to this computer from the Internet check box for this network card, unless you have another firewall between the computer and the Internet. This is very important.
- Click OK, and Internet Connection Sharing will be enabled.

lalu di lanjutkan
The 'Host' computer is the system that will be connecting to the Internet; 'Client' refers to any computer that is sharing the Internet connection, and is connecting to the Host computer.
If Networks Physical Setup is already in place and fully operational and your LAN is setup properly for ICS then follow the following steps.
On the HOST PC
- Goto Start --> Programs --> Accessories --> Communications --> Network Setup Wizard.
- The first thing to do when the wizard appears is read the welcome message, and then click Next.
- Read the 'Before you continue....' message, and then click Next.
- Select the option This computer connects directly to the Internet. The
other computers on my network connect through this computer, and then press Next. - Now, type in a Description for your computer; ie: Host Computer.
- Enter a Computer Name (or leave it as it's Default), and then press Next.
- Enter a Workgroup Name -- or leave it as it's default, and then press Next.
- If you want to share files and/or your printer with other computers on the network, select the option Turn on file and printer sharing and press Next.
- Check the information; if it is all fine, press Next.
On the CLIENT PC
- Goto Start --> Programs --> Accessories --> Communications --> Network Setup Wizard.
- The first thing to do when the wizard appears is read the welcome message, and then click Next.
- Read the 'Before you continue....' message, and then click Next.
- Select the option This computer connects to the Internet through a residential gateway or another computer on my network, and then press Next.
- Now, type in a Description for your computer; ie: Client1 Computer.
- Enter a Computer Name (or leave it as it's Default), and then press Next.
- Enter the same Workgroup Name that you used on the HOST computer, and then press Next.
- If you want to share files and/or your printer with other computers on the network, select the option Turn on file and printer sharing and press Next.
- Check the information; if it is all fine, press Next.
- Now, if possible, you should Create a Network Setup Disk -- once you have created a Network Setup Disk, insert it into any other computer on your network that you intend to use as a Client and run it; follow all prompts. If you cannot create a Network Setup Disk, then repeat the above steps on all Client PC's, however ensure that you give each Client computer a unique name; ie: Client1, Client2, Client3 etc..
To Setup ICS On the HOST PC
- Open the Network Connections window (Start --> Programs --> Accessories --> Communications --> Network Connections). Here, you should have at least two connections listed: one for your Internet Connection, and one for the Ethernet adapter connected to your Local Area Network (LAN).
- Right-click the connection icon corresponding to your Internet Connection and select Properties.
- Choose the Advanced tab, and turn on the Allow other network users to connect through this computers Internet connection option. Click OK when you're done.
- Verify that Internet Connection Sharing is enabled; it should say Enabled, Shared in the Network Connections window.
- You should now be able to access the Internet by connecting the Host computer to your Service Provider -- Client computers do not need to connect; simply open up Internet Explorer and you should be able to browse. If you are unable to connect to Internet Explorer on the Client computers, ensure that the Host computer has an active connection to the Internet.
Wednesday, November 10, 2010
setup vpn windows server 2003 versi microsoft
This step-by-step guide describes how to set up a Routing and Remote Access service on Windows Server 2003 Standard Edition or Windows Server 2003 Enterprise Edition to allow authenticated users to remotely connect to another network by way of the Internet. This secure connection provides access to all internal network resources, such as messaging, file and print sharing, and Web server access. The remote character of this connection is transparent to the user, so the overall experience of using remote access is similar to that of working at a workstation on a local network.
Installing the Routing and Remote Access Service
By default, the Routing and Remote Access service is installed automatically during the Windows Server 2003 installation, but it is disabled.
To Enable the Routing and Remote Access Service
- Click Start, point to Administrative Tools, and then click Routing and Remote Access.
- In the left pane of the console, click the server that matches the local server name.
- If the icon has a red arrow in the lower-right corner, the Routing and Remote Access service is not enabled. Go to step 3.
- If the icon has a green arrow pointing up in the lower-right corner, the service is enabled. If so, you may want to reconfigure the server. To reconfigure the server, you must first disable Routing and Remote Access. To do this, right-click the server, and then click Disable Routing and Remote Access. Click Yes when you are prompted with an informational message.
- Right-click the server, and then click Configure and Enable Routing and Remote Access to start the Routing and Remote Access Server Setup Wizard. Click Next.
- Click Remote access (dial-up or VPN) to permit remote computers to dial in or connect to this network through the Internet. Click Next.
- Click VPN for virtual private access, or click Dial-up for dial-up access, depending on the role you want to assign to this server.
- On the VPN Connection page, click the network interface that is connected to the Internet, and then click Next.
- On the IP Address Assignment page, do one of the following:
- If a DHCP server will be used to assign addresses to remote clients, click Automatically, and then click Next. Go to step 8.
- To give remote clients addresses only from a pre-defined pool, click From a specified range of addresses.
NOTE: In most cases, the DHCP option is simpler to administer. However, if DHCP is not available, you must specify a range of static addresses. Click Next.
The wizard opens the Address Range Assignment page.- Click New.
- In the Start IP address box, type the first IP address in the range of addresses that you want to use.
- In the End IP address box, type the last IP address in the range.
- Click OK to return to the Address Range Assignment page.
- Click Next.
Windows calculates the number of addresses automatically.
- Accept the default setting of No, use Routing and Remote Access to authenticate connection requests, and then click Next.
- Click Finish to enable the Routing and Remote Access service and to configure the remote access server.
After you set up the server to receive dial-up connections, set up a remote access client connection on the client workstation.
To Set Up a Client for Dial-Up Access
To set up a client for dial-up access, follow these steps on the client workstation.
NOTE: Because there are several versions of Microsoft Windows, the following steps may be different on your computer. If they are, see your product documentation to complete these steps.
- Click Start, click Control Panel, and then double-click Network Connections.
Under Network Tasks, click Create a new connection, and then click Next. - Click Connect to the network at my workplace to create the dial-up connection, and then click Next.
- Click Dial-up connection, and then click Next.
- On the Connection Name page, type a descriptive name for this connection, and then click Next.
- On the Phone Number to Dial page, type the phone number for the remote access server in the Phone Number dialog box.
- Do one of the following, and then click Next:
- If you want to allow any user who logs on to the workstation to have access to this dial-up connection, click Anyone's use.
- If you want this connection to be available only to the currently logged-on user, click My use only.
- Click Finish to save the connection.
To Set Up a Client for VPN Access
To set up a client for virtual private network (VPN) access, follow these steps on the client workstation.
NOTE: Because there are several versions of Microsoft Windows, the following steps may be different on your computer. If they are, see your product documentation to complete these steps.
- Click Start, click Control Panel, and then double-click Network Connections.
Under Network Tasks, click Create a new connection, and then click Next. - Click Connect to the network at my workplace to create the dial-up connection, and then click Next.
- Click Virtual Private Network connection, and then click Next.
- On the Connection Name page, type a descriptive name for this connection, and then click Next.
- Do one of the following, and then click Next.
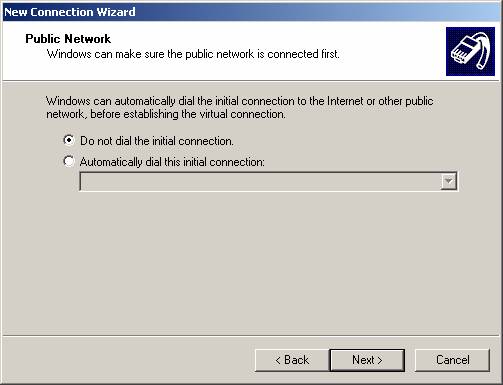
If the computer is permanently connected to the Internet, click Do not dial the initial connection.
If the computer connects to the Internet by way of an Internet service provider (ISP), click Automatically dial this initial connection, and then click the name of the connection to the ISP. - Type the IP address or the host name of the VPN server computer (for example, VPNServer.SampleDomain.com).
- Do one of the following, and then click Next:
- If you want to allow any user who logs on to the workstation to have access to this dial-up connection, click Anyone's use.
- If you want this connection to be available only to the currently logged-on user, click My use only.
- Click Finish to save the connection.
Granting Users Access to Remote Access Servers
You can use remote access policies to grant or deny authorization, based on criteria such as the time of day, day of the week, the user's membership in Windows Server 2003-based security groups, or the type of connection that is requested. If a remote access server is a member of a domain, you can configure these settings by using the user's domain account.
If the server is a stand-alone server or a member of a workgroup, the user must have a local account on the remote access server.
Grant Remote Access Rights to Individual User Accounts
If you manage remote access on a user account basis, follow these steps to grant remote access rights:
- Click Start, point to All Programs, point to Administrative Tools, and then click Active Directory Users and Computers.
- Right-click the user account that you want to grant remote access rights to, click Properties, and then click the Dial-in tab.
- Click Allow access to grant the user permission to dial in, and then click OK.
Configure Remote Access Rights Based on Group Membership
If you manage remote access on a group basis, follow these steps to grant remote access rights:
- Create a group that contains members who are permitted to create VPN connections.
- Click Start, point to Administrative Tools, and then click Routing and Remote Access.
- In the console tree, expand Routing and Remote Access, expand the server name, and then click Remote Access Policies.
- Right-click the right pane, point to New, and then click Remote Access Policy.
Click Next, type the policy name, and then click Next. - Click VPN for virtual private access, or click Dial-up for dial-up access, and then click Next.
- Click Add, type the name of the group that you created in step 1, and then click Next.
Follow the on-screen instructions to complete the wizard.
If the VPN server already permits dial-up networking remote access services, do not delete the default policy; instead, move it so that it is the last policy to be evaluated.
To Establish a Remote Connection
NOTE: Because there are several versions of Microsoft Windows, the following steps may be different on your computer. If they are, see your product documentation to complete these steps.
On the client workstation, click Start, click Network Connections, and then click the new connection that you created.
In the User Name box, type your user name.
If the network to which you want to connect has multiple domains, you may have to specify a domain name. If this is the case, use the domain_name\user name format in the User Name box.
In the Password box, type your password.
If you use a dial-up connection, check the phone number that is listed in the Dial box to make sure that it is correct. Make sure that you have specified any additional numbers that you must have to obtain an external line or to dial long-distance.
Click Dial or Connect (for VPN connections).
Your computer establishes a connection to the remote access server. The server authenticates the user and registers your computer on the network.
Configure VPN Connection Introduction on Windows XP or Windows 2000
In this article we will learn how to configure a connection to a virtual private network (VPN) using Windows XP. This article will show you how to create a new VPN connection using Microsoft Windows XP. By creating an encryption tunnel through the Internet, data can be passed safely.
VPN Overview
A VPN is a private network created over a public one. It’s done with encryption, this way, your data is encapsulated and secure in transit – this creates the "virtual" tunnel. A VPN is a method of connecting to a private network by a public network like the Internet. An internet connection in a company is common. An Internet connection in a Home is common too. With both of these, you could create an encrypted tunnel between them and pass traffic, safely - securely.
If you want to create a VPN connection you will have to use encryption to make sure that others cannot intercept the data in transit while traversing the Internet. Windows XP provides a certain level of security by using Point-to-Point Tunneling Protocol (PPTP) or Layer Two Tunneling Protocol (L2TP). They are both considered tunneling protocols – simply because they create that virtual tunnel just discussed, by applying encryption.
Configure a VPN with Windows XP
If you want to configure a VPN connection from a Windows XP client computer you only need what comes with the Operating System itself, it's all built right in. To set up a connection to a VPN, do the following:
1. Click Start, and then click Control Panel.
2. In Control Panel, double click Network Connections
3. Click Create a new connection in the Network Tasks task pad
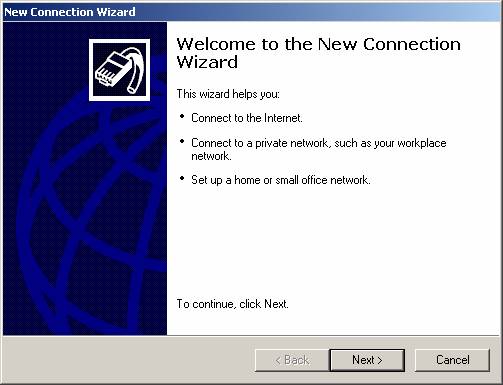
4. In the Network Connection Wizard, click Next
5. Click Connect to the network at my workplace, and then click Next
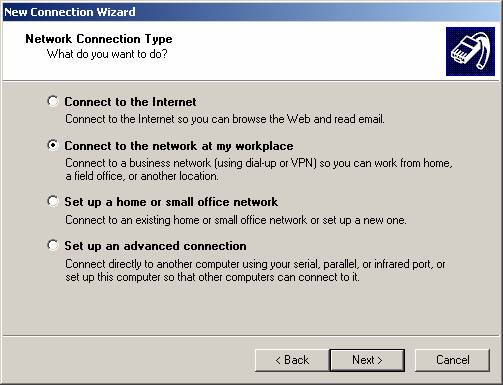
6. Click Virtual Private Network connection, and then click Next
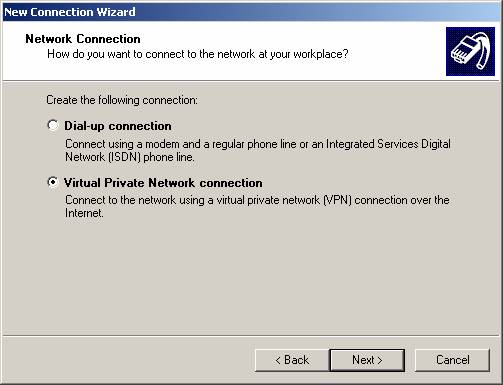
7. If you are prompted, you need to select whether you will use a dialup connection or if you have a dedicated connection to the Internet either via Cable, DSL, T1, Satellite, etc. Click Next
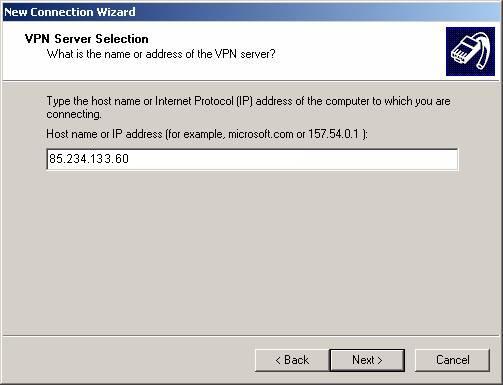
8. Type a host name, IP or any other description you would like to appear in the Network Connections area. You can change this later if you want. Click Next
9. Type IP address of our VPN server that we provide to you. Click Next
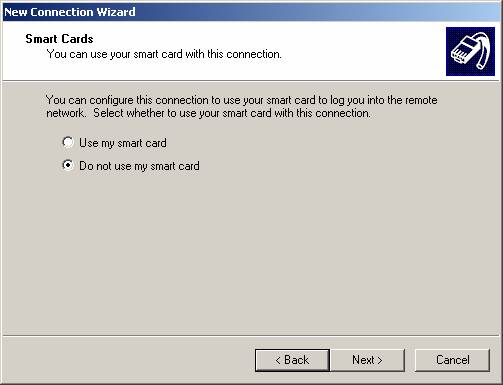
10. You may be asked if you want to use a Smart Card or not
11. You are just about done, the rest of the screens just verify your connection, click Next
12. Click to select the Add a shortcut to this connection to my desktop check box if you want one, if not, then leave it unchecked and click finish
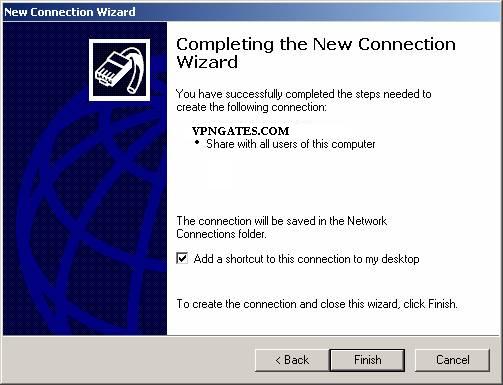
13. You are now done making your connection, but by default, it may try to connect.
Connecting to VPN server
Now that you have your VPN client all set up and ready, the next step is to attempt a connection to VPN server. To use the connection follow these simple steps. To open the client again, go back to the Network Connections dialog box.
1. One you are in the Network Connection dialog box, double-click, or right click and select "Connect" from the menu
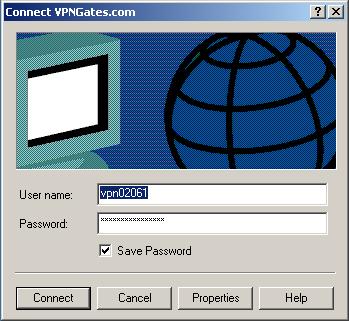
2. Type your user name and password, and then click Connect.
3. To disconnect from a VPN connection, right-click the icon for the connection, and then click "Disconnect"
Thursday, November 4, 2010
Setting Speedy pada Modem ADSL TP-Link
Anda menggunakan Modem TP-Link untuk koneksi speedy Anda? Pengen tahu cara setting nya? Ya, siapa tahu bagi rekan-rekan yang seneng ngoprek tapi kelupaan bikin backup settingnya.. ga usah panik. Tinggal Anda reset modem Anda dan ikuti artikel berikut ini, insyaallah berhasil. Kali ini saya akan paparkan cara setting koneks speedy menggunakan modem TP-Link TD 8817 yang sering digunakan Telkom.
Sebelum berlanjut, saya ingin ingatkan pengetahuan dasar tentang modem terutama yang diterapkan pada mainan kita kali ini, TPLINK TD-8817. Pada dasarnya modem menjalankan tugasnya dalam (minimal) 3 mode konektivitas:
Koneksi berbasis IP Address: maksudnya, pengguna terkoneksi dengan jaringan internet dengan diberi IP khusus oleh pihak ISP. Ada dua turunan dari mode ini:
- Dynamic IP Address (DHCP): di sini IP diatur oleh pihak ISP dan diperoleh secara otomatis oleh modem. Modem otomatis akan meminta dan pihak ISP akan merespon dengan memberi IP Address.
- Static IP Address: Pihak ISP mengalokasikan IP Address khusus untuk tiap pengguna. IP ini yang dimasukkan secara tetap(statis) di dalam modem dan melakukan koneksi dari IP tersebut.
PPPoE/PPPoA: Singkatan dari Point-to-Point Protocol over Ethernet/Point-to-Point Protocol over ATM. Pada mode ini, modem melakukan proses Dial-Up dari suatu titik ke titik pusat (server ISP) melalui jaringan. Mode ini yang secara default digunakan standar operasi pemasangan modem ADSL Telkom Speedy. Nah, dalam tulisan ini saya akan fokus pada mode ini.
Bridge: Modem berfungsi sebagai bridge, menjembatani koneksi yang dilakukan oleh PC ke server ISP. Mode ini diperlukan jika Anda memiliki router atau server yang Anda set untuk melakukan Dial-Up koneksi. Mode inilah yang dipakai jika Anda kita melakukan Setting Dial Up Speedy dengan Router Mikrotik yang pernah saya tulis sebelumnya.
WIZARD, CARA CEPAT SETTING KONEKSI
Sebenarnya ada berbagai cara melakukan setting koneksi pada modem ADSL TP-Link yang kita bicarakan sekarang. Bagi Anda yang sudah mahir dan nyaman, Anda bisa langsung masukkan kode dan IP jaringan Anda. Cukup rumit memang, tapi tentu itu semua terbayar dengan kestabilan yang dapat Anda kontrol sendiri. Namun jangan khawatir, bagi Anda yang tidak mau ribet atau belum memiliki keterampilan tersebut, saya akan sampaikan cara mudah melakukan berbagai setting tersebut. Yakni dengan Wizard.
Untuk memulai, pastikan Anda memiliki akses jaringan langsung ke modem TP-Link Anda. Kemudian ikuti langkah berikut:
Buka browser Anda, masukkan alamat IP modem Anda dalam Address bar browser. Default nya adalah 192.168.1.1, kemudian tekan Enter atau tombol Go.

Ketika muncul jendela Authentification Required, masukkan username dan password;

Default dari vendor adalah:
User Name : admin
Password : adminatau
User Name : admin
Password : 1234
Pada halaman utama pilih Quick Start > Run Wizard.

Pada tampilan berikut, klik Next.
Pilih Zona waktu menjadi (GMT+07:00) Bangkok, Jakarta, Hanoi. Kemudian klik Next.

Pilih tipe koneksi PPPoE/PPPoA. Kemudian klik Next.

Keterangan: Jika Anda menggunakan Router atau Server seperti mikrotik untuk melakukan Diall-Up, di sini Anda perlu memilih Bridge Mode, kemudian klik Next hingga Finish.
watch it & disini paling penting

Pada konfigurasi berikut, masukkan:
# Username : nomerspeedyanda@telkom.net
# Password : password
# VPI: 0
# VCI : 35
# Connection Type : PPPoE LLc.
# selanjutnya klik Next
Keterangan:
- Speedy menggunakan mode DHCP, sehingga jika Anda menggunakan setting PPPoE, Anda tidak perlu memasukkan IP statik. Modem akan meminta langsung IP yang kosong ke server Speedy.
- Untuk kolom VPI dan VCI, silakan lihat referensi Daftar VPI dan VCI untuk Modem Speedy dari Berbagai Daerah berikut, karena setting untuk tiap daerah berbeda.
Jika Anda sudah yakin, Klik Next. Jika belum, Anda bisa klik Back dan melakukan beberapa penyesuaian.

kalo mau setting wireless

Klik Close, dan Restart Modem Anda.
NB:
Selanjutnya, jika Anda bermaksud mensetting IP Addres Anda lewat:
Local Connection Area Status > Properties > General > Internet Protocol TCP/IP > Properties > Obtain an IP Address automatically.
Jangan lupa masukkan IP DNS di dua kolom di bawah IP Address dengan IP DNS dari speedy. Anda bisa melihat daftar DNS Speedy yang sering dipakai pada artikel berikut ini:
Server DNS Speedy Paling Cepat dan Tepat
Mudah bukan? Jika tidak keberatan, silakan masukkan pengalaman dan komentar Anda.
semoga bermanfaat.
Akses D-Link IP Camera melalui Handphone (via jaringan 3G)
Sekarang ini saya akan membahas bagaimana caranya akses D-Link IP Camera melalui Handphone (via jaringan 3G tentunya, karena bila menggunakan GPRS, pelan sekali speed-nya).
Seperti yang kita tahu bahwa ada beberapa tipe IP Camera D-Link yang support 3GPP dan RTSP diantaranya DCS-2120, DCS-2102*, DCS-2121*, DCS-3410*, DCS-3415*, DCS-3110*, DCS-5220, DCS-5610*, dan DCS-6110* (*tipe terbaru). Bila ingin informasi lebih detil mengenai IP Camera kami silahkan menghubungi kami atau klik disini.
Pada Howto kali ini saya menggunakan DIR-655 sebagai Wireless Router dan untuk IP Camera, saya menggunakan DCS-5220. Koneksi internet saya menggunakan Biznet MetroNet 2 Mbps.
Layout dalam Howto kali ini adalah spt gambar dibawah :
![[layout.jpg]](https://blogger.googleusercontent.com/img/b/R29vZ2xl/AVvXsEiHRX5mX1JL41QgKzpEM1Fhu8mSRMTId5BAjbFXWQhQ4Uq7gFwvfsvU-arjdiFpdHC_HB96Nk4bAglDdt-9F4rKpPTRgZmOlSap5auXfbreZZjYPS7vC00eyC14Wxz_gsjWZUVqQzML9_E/s1600/layout.jpg)
DIR-655 (dalam Howto ini menggunakan firmware versi 1.21WW) :
WAN IP : PPPoE
LAN IP : 192.168.10.1 (saya ganti dari defaultnya yang 192.168.0.1)
Wireless : Saya gunakan enkripsi WPA-PSK
DHCP Server : Assign static DHCP untuk DCS-5220 :
![[F.JPG]](https://blogger.googleusercontent.com/img/b/R29vZ2xl/AVvXsEjgrPtghd8x2wJhcCmVm0YSTDJM8JtN6-9uj8insHtgierqsN53FPHgdn_xPF4dwTVRK_g4paXX3orxEHtmf3PKAOQln7bS8f-tjJifVg5FkeddEgS1s8lJeoihxaH6Ude6wV_-jWc_Sfc/s1600/F.JPG)
Virtual Server :
![[D.JPG]](https://blogger.googleusercontent.com/img/b/R29vZ2xl/AVvXsEi3sh4gU8OvXr9gZKS0C8NiRKr_45Aa55BaOW0gZajIkUeiOAklu4MNFXQliJ2BjSxhShfhy1vrslEFsCNSB-hjFw4qv6hMa3LryI6n6BrHyOjK8TGp3s0ZLoaNncIf0C5jefxqwr1TFVs/s1600/D.JPG)
Untuk port http, saya ubah ke port 8889 untuk Public Port, sedangkan untuk Private Port tetap menggunakan port 80. Sementara untuk RTSP, saya tetap menggunakan port default yaitu 554 baik Public maupun Private. Port RTSP ini lah yang digunakan oleh mobile phone untuk melakukan streaming. Lebih jelas mengenai RTSP bisa buka disini.
Kalau masih bingung mengenai Public and Private Port, klik disini
Bila WAN IP didapat Dynamic Public IP maka bisa setting Dynamic DNS, klik disini. Pada contoh ini, saya menggunakan Dynamic DNS dan hostname yang saya gunakan : dlink-id.dlinkddns.com
DCS-5220 (dalam Howto ini menggunakan firmware versi 1.04) :
IP : Saya set Dynamic, namun pada DIR-655, kita assign DHCP Static untuk DCS-5220 ini, jadi IP-nya akan selalu sama.
![[A.JPG]](https://blogger.googleusercontent.com/img/b/R29vZ2xl/AVvXsEhhyDrOVBvBjmp-p6zM0DDyb56sSxhrvp1KSGq7v7nqisQNpqDMDjAuG0OkcJDVGHoS1PhQPJOWQPKp6vG1_Cn0UwvR-pqnJZD5dnwXDcIfPzKEsxXeqD7rF8QIi6zqrocsG8A5-7M-lRs/s1600/A.JPG)
Port Setting, disini saya menon-aktifkan RTSP Authentication karena tidak semua RTSP client pada mobile phone mendukung RTSP Authentication.
![[B.JPG]](https://blogger.googleusercontent.com/img/b/R29vZ2xl/AVvXsEiXmMY8dvnN2YGdYILr0tMBk78DO7LnggyUwALcuQy2MZ5G5LroAdwHvvtDmqVtiaMUMLtVyaMuoTRkZ61J6RF3a9Nm8HxiGj8mrhqtdq3FUGaOSgcGE-fZhG8qfDqOn33at4wYg9PVrw4/s1600/B.JPG)
Lalu set Wireless di DCS-5220 agar dapat join dengan DIR-655 :
![[C.JPG]](https://blogger.googleusercontent.com/img/b/R29vZ2xl/AVvXsEjn1_vrxW0cEhj4pGSk06rCrCV9iQM9ssuN6OYLvxM9r08GN-V_b3I4MrQYNweByjT6uxzf1ZSvc9R_MKA64TSOlwVv1nb32WGARh0Ahy7ur5yACDXfCuW9IzkKiEncdFggcBRcxyt4zSk/s1600/C.JPG)
Sebelum kita buka dengan mobile phone, kita coba test dulu buka dengan http untuk memastikan Camera dalam keadaan baik dan memastikan virtual server pada router juga bekerja dengan baik :
![[E.JPG]](https://blogger.googleusercontent.com/img/b/R29vZ2xl/AVvXsEizEzPX4rWrxawVUmv6lQjqHq6ky0iluVp-60ZL3LiYQm-qDGvfzs4qB4DPt5Np5mDd-lCTgh87i8GI45bV7ccowa4tTYzRHvYqYipFoKehPxztRa2YTQxe9lkBuVeX7UEGtjXNQXG_F-I/s1600/E.JPG)
Setelah semuanya berjalan dengan baik, kita dapat mengakses-nya melalui mobile phone. Pada contoh kali saya menggunakan Sony Ericsson K800i (D-Link tidak ada kepentingan sales/marketing apapun dengan Sony Ericsson, hanya sbg contoh saja). Bila ingin menggunakan mobile phone merek lain misalnya Nokia, Samsung, Motorola, dll, silahkan konsultasi dengan user manual masing-masing merek, apakah sudah support RTSP atau belum. Langkah2nya :
1. Buka menu SE K800i lalu pilih menu Internet
![[SE-1.JPG]](https://blogger.googleusercontent.com/img/b/R29vZ2xl/AVvXsEjcJfpV4iaLlNci74nJ62Pkmp2izwU-T6hvwyZFn1su8DIWcQ8VA-Y6eWvX069Zzm0DXeXaPbu9gof4n0TjgV2dEQyL1m7AHwlsrgVcsPTmWIuT26X0uycTABhuUqPIIUTcwf1Wrs5upNQ/s1600/SE-1.JPG)
2. Setelah masuk ke menu Internet, pilih More, lalu pilih Go to
![[SE-3.JPG]](https://blogger.googleusercontent.com/img/b/R29vZ2xl/AVvXsEiYhKBazRFL9NhtVPWgphjzIthDhazqrhnT-wEr96jje2oIr-IQP_BCNImSgpixYhUJDrIj2BhyphenhyphenbhOcR5RdHEzJJOwu07xjoMLnZL44QB66bt1G4JxW0Z3Awm2HdwDNYFgbFNNn_Lfd1jA/s1600/SE-3.JPG)
3. Pada menu Go to, pilih Enter address
![[SE-4.JPG]](https://blogger.googleusercontent.com/img/b/R29vZ2xl/AVvXsEjhHhGhZjams-aDpDa2-QD2uL5jum1Ub3EEVlDmSn_PokBY96H79_DGtl0WRxJEKGV-qt4nmim035krQZlGndWIwVbSNpRt4p1CXoCI8U4wK0L-T32dBjFwtOEIi_kKgkuJGsDFoy057JM/s1600/SE-4.JPG)
4. Lalu ketik addressnya dengan format rtsp://alamat URL-nya/access name for mobile viewing (lihat pada bagian Port Detail Setting), dalam contoh ini URL-nya adalah rtsp://dlink-id.dlinkddns.com/ep-live.3gp
![[SE-5.JPG]](https://blogger.googleusercontent.com/img/b/R29vZ2xl/AVvXsEjaS5h04UPxWq2yLd9dTRedzIUDCXJDy7zmJGldnAJ-e6XIPmqGLzFI07bXu1Wfr395ySiFDIQq6zodrCcav9E05COybfO9nhuj1LpDsAAIgqaRFUWAJ9WDx44xbGFIbCGwh5RsXappSwE/s1600/SE-5.JPG)
5. Setelah itu tunggu sampai terkoneksi dan status Connected
![[SE-6.JPG]](https://blogger.googleusercontent.com/img/b/R29vZ2xl/AVvXsEhO8K6yS2sK2QJevSp46BBwhznnlCaMFbcbVZO_wpzGw5hQ8smOmHb_NejCqKDvrRqEI_TkLA2Rvbaz3KKFQl0Jgrqp_yYR9-mSTB53U6TNC_difcqctNWMIykOVDeCDY_OJpLmVpnfV6U/s1600/SE-6.JPG)
6. Setelah terkoneksi maka akan muncul live streaming-nya :
![[SE-8.JPG]](https://blogger.googleusercontent.com/img/b/R29vZ2xl/AVvXsEiu98HRCsJmlzgVPTjfsAF6x5GAYVaNrFkIS3TIypl1_m767xoi3tJDy7fFMLQJcXYQmITLIWRylY4YZ-hp99Kj9gfdojoygU7FjH_P4rqhqrPnBoj2UNgtkvEZzhITxYrkCaCZgyCTN2s/s1600/SE-8.JPG)
Diposkan oleh D-Link Indonesia di 12.23 15 komentar
Akses IP Camera dari internet (dalam contoh ini menggunakan Cable Internet)
Banyak pertanyaan datang ke kami : "Bagaimana caranya membuat IP Camera kita dapat diakses dari internet?". Sebenarnya cukup mudah untuk melakukan ini, di semua D-Link Broadband Router terdapat fitur yang disebut Virtual Server.
Cara kerja fitur ini cukup sederhana yaitu mem-forward port-port tertentu ke sebuah mesin di jaringan internal kita. Lalu apa bedanya Virtual Server dengan Port Forwarding? Cara kerjanya hampir sama, hanya dengan Port Forwarding kita bisa menggunakan banyak port (misalnya dari 8000-8010 atau 80,90,100) sdgkan Virtual Server hanya dapat menggunakan satu buah port (misalnya 8000 saja)
Dalam contoh kali ini, saya akan menggunakan koneksi FirstMedia (Fastnet), DIR-655 sebagai Router dan DCS-6620 sebagai IP Camera-nya.
Layout seperti dibawah ini :
![[Camera+with+Cable+Modem.jpg]](https://blogger.googleusercontent.com/img/b/R29vZ2xl/AVvXsEgBY6gh3Nh9FSSjqqPy3FIwM2b-VKYhZ-WMALYRb5_qZ-7k3PsNjvVYjVK4agSgB3gfMrkuFRLUg4dCEYCareifrC-DQ39iov05-hsI8riMI5_DrLGlGbmF5P0sH8Gnk5Ws8ah6WXB4dgY/s1600/Camera+with+Cable+Modem.jpg)
IP WAN DIR-655 didapat secara dynamic dari ISP, sedangkan IP LAN-nya diset default yaitu 192.168.0.1
Untuk DCS-6620, IP-nya diset ke 192.168.0.80 dengan gateway dan DNS ke 192.168.0.1, untuk port HTTP dalam contoh ini saya ganti menjadi port 8000 (anda bisa mengganti dengan port berapa saja (diatas 1024), asalkan tidak konflik dengan yang sudah ada ). Bisa dilihat di gambar berikut :
![[3.JPG]](https://blogger.googleusercontent.com/img/b/R29vZ2xl/AVvXsEjy2IDLnsFsUslzPvA1ccZi86ftX9QLtXnWm8-dS9gLMXXMkA67cZGhMP1ZTOLu6trJumHCbnJPRyIXA61lM2eGnuSQQRkRzQjIuTd1WUvi3_GrTF41_abwoAAHkYtq_6qkuRzYj85ovkA/s1600/3.JPG)
Setelah selesai maka kita set Virtual Server di DIR-655, masukkan IP si Camera dan set Public Port ke 8000 dan Private Port ke 8000. Apa beda Public Port dan Private Port? Public Port adalah Port yang "terlihat" di internet sedangkan Private Port adalah port si Camera itu sendiri (ingat tadi saya menggantinya ke 8000)
![[1.JPG]](https://blogger.googleusercontent.com/img/b/R29vZ2xl/AVvXsEgLmddcrvViE1P0_oPime15sjhfF0ZtlPp9qetW636TsGwMZzLcxywZt7s76mYwY9IUC6HlbuP4zX32teZ6VHgiaTNa94naQeHuHaEx3jUQxnKERshreTTtxaoPFCk2eV5SqTSwBXJXD6E/s1600/1.JPG)
Setelah selesai tinggal "Save Settings" dan bila ada perintah "Reboot Now", reboot DIR-655 anda.
Nah sekarang kita cek berapa IP WAN yang didapat (karena IP dari ISP adalah dynamic) :
![[new+2.JPG]](https://blogger.googleusercontent.com/img/b/R29vZ2xl/AVvXsEgqeWJ1c3UvzEgL0aqaZ0OGqD3PsJ3lyO6G1vpRtb6IL5RqxUwkwIxz3Gi0tX5BwHYCPS6_XYxxQMxqmT0JDcg2VzfMBCKm4pbWS8H6C7VrI0pvCLrldNlgyV7294a9snfQZM_a5DTZ2vg/s1600/new+2.JPG)
Setelah itu kita coba dari koneksi lain, misalnya dari ADSL tetangga atau teman :-D atau minjem 3G sodara :-D, untuk mengakses IP Camera, kita cukup dengan menuliskan alamat di Internet Explorer dgn format : http://A.B.C.D:xxxx dimana A.B.C.D adalah IP WAN yang kita liat dari Status --> Device Info tadi dan xxxx adalah Public Port yang kita define di settingan Virtual Server.
Contohnya :
![[4.JPG]](https://blogger.googleusercontent.com/img/b/R29vZ2xl/AVvXsEgcTooApuB2Hg3nBVtdW7RWy_TZGqxuBTND0-sbaV8G6hvUWiXU-jDbLhnHZtxUwtiG1GkfAKVyrXxc4i8wHAQ27WXyy5z_4yo1j57oClmmgXtjuFR7atJqf4pyLKQxjiOhX9HyiFuWnOI/s1600/4.JPG)
Sekarang yang jadi pertanyaan, apakah kita harus cek WAN IP di router kita terus menerus kalo kita mau lihat IP Camera kita? Selama WAN IP kita adalah Dynamic IP maka jawabannya "Ya". Lalu ada pertanyaan lainnya, adakah cara untuk mempermudahnya, jawabannya jelas ada, kita dapat menggunakan fitur DDNS dalam hal ini. Bagaimana caranya? Saya akan jelaskan di posting berikutnya :-)
Dynamic DNS
Seperti yang telah saya janjikan, sekarang kita akan bahas mengenai Dynamic DNS. Sederhananya Dynamic DNS adalah suatu service yang memungkinkan setiap adanya perubahan IP Public pada perangkat networking kita (umumnya router) maka secara otomatis si router akan memberitahukan ke penyedia jasa Dynamic DNS ini untuk meng-update alamat domain name kita.
Misalnya : pada hari Senin, router kita mempunyai IP Public 125.1.1.1 dan kita daftar DDNS dan misalnya kita gunakan host http://coba.dlinkddns.com, pada saat kita mendaftar, IP 125.1.1.1 akan di-map ke http://coba.dlinkddns.com. Nah pada hari Selasa, kita menghidupkan router dan mendapati IP Public berubah menjadi 125.2.2.2. Pada saat IP berubah maka si router akan "bilang" ke si penyedia DDNS (dalam hal ini dlinkddns.com) bahwa IP-nya sudah berubah, si penyedia DDNS akan segera mengupdate recordnya dan sekarang http://coba.dlinkddns.com tidak menunjuk ke IP 125.1.1.1 lagi tapi ke IP yang baru yaitu 125.2.2.2
D-Link sebagai salah satu penyedia perangkat networking terbesar, bekerja sama dengan salah satu penyedia Dynamic DNS terbesar yaitu DynDNS, membuat layanan khusus Dynamic DNS untuk para pengguna product D-Link, yaitu http://www.dlinkddns.com. Layanan ini bersifat gratis (dan dapat diupgrade ke layanan berbayar). Bedanya dengan layanan DynDNS yang gratis adalah penggunaan dlinkddns lebih simpel.
Disini saya akan membahas bagaimana menggunakan Dynamic DNS pada D-Link Router :
1. Daftar sebuah account di http://www.dlinkddns.com
2. Setelah semuanya selesai, login menggunakan account itu
![[1.JPG]](https://blogger.googleusercontent.com/img/b/R29vZ2xl/AVvXsEj0zRScdDcNFjGB7FC9Il-L7t09A6561hmFIVhifoVlwWaGiwQ88NKu2QtVWS2t01_I9msaNjUtjSPBn_n52p6VYPgCn2GtuFqSoKkSipNECJJPt627viki2L-yXEgf-frNQSYNj6S7FKs/s1600/1.JPG)
3. Pilih Add Host
![[2.JPG]](https://blogger.googleusercontent.com/img/b/R29vZ2xl/AVvXsEicyZboz3DZSQMNftZYVgk7tpTXTe3m0QAH9ZwzKWXERp0Y4CGAHookLk3IqVS0BLz_JlhDMQFvagmwyh_aXiErC_274QFUH-R90W96qQh7iQZz2SyZ5a3Bj7aXFoZ0E5ulHv4qFeIDDLQ/s1600/2.JPG)
4. Masukkan hostname yang anda inginkan, pada contoh ini saya menggunakan "dlink-id"
![[4.JPG]](https://blogger.googleusercontent.com/img/b/R29vZ2xl/AVvXsEjTun-fo3IK4IrMoO99EYkw8gbbczhPMVoaEdRyeDnS2GY_0QEh4_LVEncGrB4VG497NYWg444yYwTWDeV6j2M3NyzgZMe9qOQGUg07I0MwA-eNg284x5JsenLAlxI314uhT9R6AVb5y9o/s1600/4.JPG)
Pada baris "Browser IP Address", itu adalah alamat IP Public actual anda yang terbaca oleh dlinkddns. Anda bisa men-cek-nya apakah sama dengan IP Public pada Router anda :
![[3.JPG]](https://blogger.googleusercontent.com/img/b/R29vZ2xl/AVvXsEgqXCuJ-bOV65KofdDqvFsoScWvggKuMPrgJZsSykPao75FpqWS9_epdUM5cb2Hpg1Keu6qUKpCiGgtfbpgSwTnCovURtpEb5eusuQRP-jXNCSvCr9slMC9LCGbYghu_sEMyACLfvIuKLk/s1600/3.JPG)
Bila sudah sama, masukkan alamat IP tsb ke "New IP Address", lalu klik "Save"
5. Setelah itu host akan ditambah spt dibawah ini :
![[5.JPG]](https://blogger.googleusercontent.com/img/b/R29vZ2xl/AVvXsEisRxeiWH_S9hARaw47_hFfRXBJwaHNJlogyGqPIP4HyjaeLadQmdXEJSEXkQbK3f669ii8o-T52vhhrVUE-8rwyeQ6UlnxB_PNBL9DmDFKWVhI3ypTKi6FFp_nAxe89e-G5kd9tVtOY4s/s1600/5.JPG)
6. Langkah selanjutnya adalah men-setting D-Link Router, masukkan parameter-parameter kedalam menu DDNS pada D-Link router anda.
![[6.JPG]](https://blogger.googleusercontent.com/img/b/R29vZ2xl/AVvXsEjxLCfGNqFi1sdRWXrZJR3hLBTsbNDwIHKt0NQhweo7YcXfkBqwSQ-8odamXuYqA6GJq1qUNJ388uqiFDCFGEYDBELpBoPgATGzWGiy3IOm3oMGHvgeKMMqM3e5RQ0C1lk4MYXYnveox7I/s1600/6.JPG)
Enable DDNS lalu pilih Server Address (pada contoh ini menggunakan dlinkddns.com), masukkan hostname, pada contoh ini : dlink-id.dlinkddns.com, masukkan username dan password account dlinkddns.com anda. Setelah itu "Save Settings",
7. Selanjutnya testing alamat DDNS tsb, disini saya buka remote management pada router yang saya gunakan yaitu DIR-635 pada port 8000. Lalu saya menggunakan koneksi internet lain (contoh disini saya menggunakan 3G), lalu di URL saya ketik http://dlink-id.dlinkddns.com:8000 maka akan terbuka halaman login router DIR-635 saya.
![[7.JPG]](https://blogger.googleusercontent.com/img/b/R29vZ2xl/AVvXsEgUB8CKiBLHFh2J2GaRd1xmrEkFZ64KRGK3YYRJTf8QJiVdoCcTk4wtsz-WbMqM_PJGzooUYgxl23ZY6ubb_jOvj_hHu-hiaqq4qpwgZznOEV4fTHTQHqkxxAI6vKgxyhLQ89mgMPppdZ0/s1600/7.JPG)
Dynamic DNS ini sangat berguna bila kita mempunyai koneksi internet dengan Dynamic Public IP.
Wednesday, November 3, 2010
SETTING ROUTER
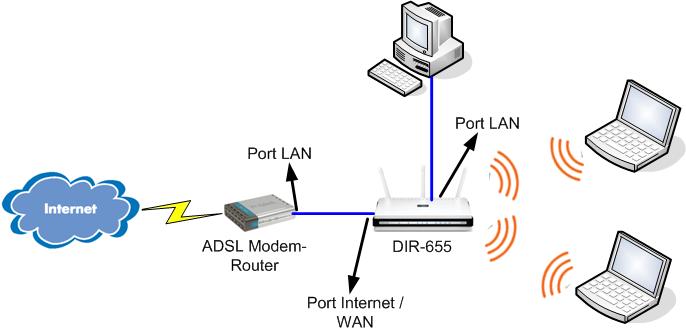
Saya sudah punya ADSL Modem-Router 1 port, lalu beli D-Link Wireless Router, Gimana cara settingnya?
Banyak pertanyaan seperti yang tertera di judul blog ini datang ke saya maupun ke Call Center kami. Jadi kebanyakan begini kasusnya begini, pengguna sudah pasang ADSL (Speedy) lalu dapat (atau beli) ADSL modem-router 1 port, kemudian ingin menambah koneksi wireless dan membeli wireless router. Setelah itu bingung bagaimana cara setting-nya, karena ada 2 router disini.
Untuk penyelesaian kasus diatas ada 2 cara yang dapat dilakukan :
1. Double NAT
Cara ini merupakan cara termudah yaitu praktis tidak melakukan settingan berarti disini. Lihat gambar dibawah ini :
Pada ADSL Modem-Router set :
- WAN IP : Masukkan VPI/VCI, lalu tentukan apakah PPPoE atau PPPoA, username dan password juga dimasukkan disini
- LAN IP : 192.168.1.1
- DHCP Server On, misalnya range 192.168.1.100-192.168.1.200
Pada Wireless Router, disini digunakan DIR-655, set :
- WAN IP (Internet) : DHCP Client
- LAN IP : 192.168.0.1
- DHCP Server On, misalnya range 192.168.0.100-192.168.0.200
"Hal yang harus diperhatikan adalah antara LAN IP ADSL Modem-Router dan LAN IP DIR-655 harus BERBEDA subnet-nya, misalnya dalam contoh diatas pada ADSL Modem-Router digunakan subnet 192.168.1.0/24 dan pada DIR-655 digunakan subnet 192.168.0.0/24"
Keuntungan dari cara ini :
- Sangat mudah
Kerugian dari cara ini :
- Karena melakukan double NAT (ada 2 router NAT disini yaitu ADSL Router dan Wireless Router) maka bila ingin melakukan virtual server atau port forwarding relatif tidak simpel karena harus 2 kali yaitu di ADSL Router dan Wireless Router
2. ADSL Modem-Router diset sbg Bridge
Cara yang kedua adalah men-set ADSL Modem-Router sebagai Bridge, sedangkan dial PPPoE dilakukan di wireless router-nya dalam hal ini DIR-655. Dengan layout sama seperti cara pertama :
![[Layout-Wireless-ADSL.jpg]](https://blogger.googleusercontent.com/img/b/R29vZ2xl/AVvXsEjiGPwjDVboSv2i2uITp2f93x9V1iwFM9UgZiyOGYb06kqg8Tpb6fHcNFntCWB3I74TZ0zmwRumApyR9FcdW51xlcFLxBGS0f_EPQygJjUxl5Rfiyp9V5uMFspD06lACepRpHN_aHSl8GA/s1600/Layout-Wireless-ADSL.jpg)
Pada ADSL Modem-Router set :
- WAN IP : Set sebagai Bridge Mode dan masukkan nilai VPI dan VCI disini
- LAN IP : 192.168.1.1
Pada Wireless Router, disini digunakan DIR-655, set :
- WAN IP (Internet) : Set ke PPPoE, masukkan username dan password yang diberikan oleh Telkom. Lalu masukkan DNS Server Telkom (atau DNS OpenDNS)
- LAN IP : 192.168.0.1
- DHCP Server On, misalnya range 192.168.0.100-192.168.0.200
Keuntungan dari cara ini :
- Karena dial PPPoE dilakukan oleh Wireless Router maka IP Public dari Telkom langsung di-assign di port Internet/WAN si Router
- Karena WAN langsung "pegang" IP Public maka Virtual Server atau Port Forwarding hanya dilakukan di DIR-655 saja
Kerugian dari cara ini :
- Tidak dapat bekerja jika anda mendapatkan layanan ADSL dengan dial PPPoA (beberapa lokasi masih menggunakan dial PPPoA untuk dapat terkoneksi)
Pertanyaan lainnya :
Apakah ada opsi lain sehingga setting semula (dgn ADSL Modem-Router) tidak ada yang berubah namun tetap dapat menggunakan koneksi wireless dan share ke beberapa komputer? Jawabannya : ADA, beli Access Point dan jangan beli Wireless Router :-D
http://blog.dlink.co.id/
Subscribe to:
Posts (Atom)